Blue On Blue Frame
By
Advanced Level
What you will need to do this tutorial:
Let's Get Started
1. Open Graphic in PSP you may use the graphic I did or one of your own. Duplicate this image and close the original. This way you won't destroy your original image.
Settings:
5. Go Effects>3D Effects>Inner Bevel select the Round Preset.
Settings:
8. Go to Image>Add Borders>Symmetric>Size 8.
Settings:
13. Go to Image>Add Borders>Symmetric Size 3. Click ok.
Settings:
21. Go to Effects>Textures>Mosaic Antique.
Settings:
23. Repeat Step 20 once again Mosaic Glass.
Settings:
28. Open White Beam Tube in PSP. Go to Edit>Copy.
Settings:
36. Click on the working image with the Brush Tool. Remember in the graphics above it shows the size should be set at 100. Click on the image one time inside the first gold rim.
Settings:
41. Go to Layers>Duplicate.
You have completed your frame. I really hope you enjoyed it. If you have any questions please feel free to email me just click on the tag below.
If you have any Questions
To Visit My Favorite Web Sites
Click on the Tags below
Web Page Created By Angel Breezes (Carol) Copyright © 2001 by Angel Breezes,
all rights reserved
CC
Carol Walters
All Rights Reserved

In this tutorial I hope to encourage you to use more Plug In and Brushes. The most important thing I hope is you Have Fun!
1. PSP 7
2. Eye Candy 3.0
3. Graphic and Tubes. Download and open in PSP.
4. Presets. Download and unzip to Paint Shop Pro Preset Folder.
5. Greg's Factory Filters Volume 1 and 2. Download and put in your Plug in folder for Paint Shop Pro.
6. Ulead Art Texture Plug In. Please download and unzip to your Paint Shop Pro Plug In Folder.
2. In bottom Color Palette Style Box select solid color white.
3. Go to Image>Add Borders> Symmetric Size 5 click ok.
4. Go to Effects>Plug Ins>Ulead>Art Texture.When the pop up window appears click on Edit button and select # 5 Gold and then follow the graphic below.
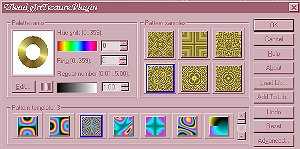
6. Go to Selections>Invert.
7. Go to Effects>3D Effects>Cut Out.
Vertical and Horizontal 0
Opacity 80
Blur 30
Color Black
Deselect The Ants
9. In top Color Style Palette select a color of your choice I used #33516A.
10. Select the white border with the Magic Wand.
11. Flood Fill the white border with chosen color.
12. Go to Effects>Plugs Ins>Greg Factory Output Volume 2>Pool Shadow.
Keep all the settings the same except for Intensity and Lightness change those to 75 click ok. Deselect the Ants.
14. Select the white border with Magic Wand Tool.
15. Apply the Ulead Art Texture as in Step 4.
16. Repeat Step 5 and apply the Inner Bevel setting. Deselect the Ants.
17. Go to Image>Add Borders>Symmetric Size 20 click ok.
18. Select white border with Magic Wand Tool.
19. Flood Fill white border with same color as before.
20. Go to Effects>Textures>Mosaic Glass.
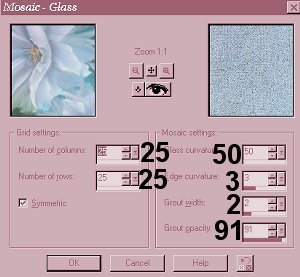
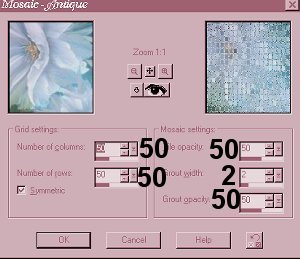
24. Go to Effects>3D Effects>Cut Out use same settings as in Step 7. Deselect the Ants.
25. Open Flower Tube In PSP that is the zip I provided. Go to Edit>Copy.
26. Click on working image and go to Edit>Paste as A New Layer. Move the flower on the right hand side so it is where you want it.
27. Go to Effects>Plug Ins>Eye Candy 3.0>Motion Trail. I applied the eye candy setting twice.

29. Click on working image go to Edit>Paste As A New Layer. Move the tube to upper right hand corner.
30. Open the Hat tube in PSP. Go to Edit>Copy.
31. Click on working image Go to Edit>Paste As A New Layer. Move hat tube to place you want on the working image.
32. Go to Layers>Merge>All Flattened.
33. Go to Layers>New Rastar Click ok.
34. In top Color Style Box select solid color white.
35. Click on the Brush Tool.
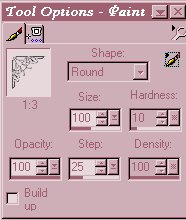
Select the Brush
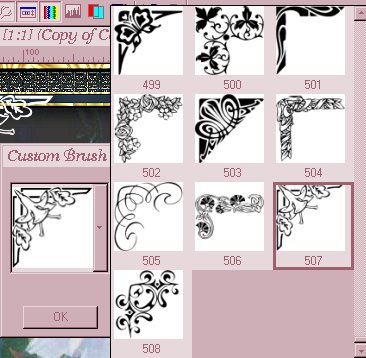
37. With the Magic Wand tool click on the working image.
38. Go to Selections>Invert. The ants should be around the brush corner only.
39. Apply the Ulead Art Texture Plug In as in Step 4.
40. Go to Effects>3D Effects>Drop Shadow.
Vertical and Horizontal 3
Opacity 40
Blur 3
Color Black
Click ok
Deselect The Ants
42. Go to Image>Mirror.
43. Go to Layers>Duplicate.
44. Go to Image>Flip.
45. Go to Layers>Merge>All Flattened.
46. Go to Image>Resize. Make sure pixel size is checked and type in 300 and make sure no number in those two boxes is above 300. At the bottom make sure both boxes have a check mark. Click ok.
48.You may choose at this time to sharpen your image if you do go to Effects>Sharpen>Sharpen.
49. Save Your Image as JPG.
Have Fun!!!
CC
Carol
click on the link below to Email me