Homemade Flame Thrower
Mirrored from the Something
Awful Forums
Posted by:
RolandTower
Posted on: Jun 27, 2004
Like any red-blooded, masculine man of the male gender, I love PVC weaponry.
You should too. If the concept of heading on down to the local Home Depot and
transforming $100 worth of random pipe bits into a killing machine doesn't
appeal to you, you're a goddamn pansy. Also, you're probably sane and will live
significantly longer than I will. Nonetheless you disgust me, and I take comfort
in the knowledge that your obituary will be nowhere near as humorous as mine.
For those of you who laugh in the face of hypersonic shards of plastic
puncturing your spleen, here's an intimate look at how I've kept myself busy for
the past week: building a PVC flamethrower. If you're not interested in the
building process, skip to the bottom of the post for the fire.
My
flamethrower has two main parts, a gun/hose assembly, and the tank. I made the
gun first:
 It's made entirely of
parts you can get at your average hardware store. The hose connects to a stop
valve, which connects to a short pipe nipple that's tapped directly into the
tank.
It's made entirely of
parts you can get at your average hardware store. The hose connects to a stop
valve, which connects to a short pipe nipple that's tapped directly into the
tank.
 The tank took a while to
make, because I let each set of chemical welds dry before doing the next ones.
The ends of the tank are two 90° elbows and two 90° street elbows, welded to
make two full 180° "U"s. One side of the tank is a 2' length of 4" sch.40 PVC,
the other is a 4"x4"x1.5" T with standard pipe attached to each 4"
socket.
The tank took a while to
make, because I let each set of chemical welds dry before doing the next ones.
The ends of the tank are two 90° elbows and two 90° street elbows, welded to
make two full 180° "U"s. One side of the tank is a 2' length of 4" sch.40 PVC,
the other is a 4"x4"x1.5" T with standard pipe attached to each 4"
socket.
 Before assembling the
parts, I drilled and threaded the two holes I needed in the tank ends: a 1/4"
standard pipe hole for the outlet to the hose, and a 1/8" standard pipe hole for
the valve that I would use to pressurize the tank. Interesting note: 1/4" and
1/8" pipes have no actual relation to the measurements of distance commonly
known as the quarter inch and eighth inch. The holes are actually 7/16" and
11/32" respectively. Hooray for non-metric measurements.
Before assembling the
parts, I drilled and threaded the two holes I needed in the tank ends: a 1/4"
standard pipe hole for the outlet to the hose, and a 1/8" standard pipe hole for
the valve that I would use to pressurize the tank. Interesting note: 1/4" and
1/8" pipes have no actual relation to the measurements of distance commonly
known as the quarter inch and eighth inch. The holes are actually 7/16" and
11/32" respectively. Hooray for non-metric measurements.


 Next step:
cement one end of the tank:
Next step:
cement one end of the tank:
 Then the other:
 After the tank dried, I
dredged up an old camping backpack to hold it. I cut a hole in the bottom of the
pack and screwed the gun/hose assembly into the base of the tank.
After the tank dried, I
dredged up an old camping backpack to hold it. I cut a hole in the bottom of the
pack and screwed the gun/hose assembly into the base of the tank.
 Finally, I screwed
in the Schrader valve (tire valve) to complete the tank:
Finally, I screwed
in the Schrader valve (tire valve) to complete the tank:
 Now the whole rig was
ready for some pressure testing. Since I would soon be running the distinct risk
of giving myself heat-assisted, deep tissue exfoliation, I was extra-careful to
make sure there weren't any leaks. I used up a lot of Teflon tape.
Now the whole rig was
ready for some pressure testing. Since I would soon be running the distinct risk
of giving myself heat-assisted, deep tissue exfoliation, I was extra-careful to
make sure there weren't any leaks. I used up a lot of Teflon tape.
 And, after filling
the tank with water for a trial run, made sure the cleanout cap was on nice and
tight
And, after filling
the tank with water for a trial run, made sure the cleanout cap was on nice and
tight
 before flipping on
the air compressor.
before flipping on
the air compressor.
 No leaks! At this
point, I had quite possibly the world's most kick-ass super-soaker.
No leaks! At this
point, I had quite possibly the world's most kick-ass super-soaker.

 Of course, I didn't go
through all that effort for a damn squirt gun. So I added a pilot light in the
form of a blow torch.
Of course, I didn't go
through all that effort for a damn squirt gun. So I added a pilot light in the
form of a blow torch.
 Much better! The
finished product:
Much better! The
finished product:


 There was
only one thing left. Add some fuel (denatured alcohol; PVC is soluble in
gasoline)
There was
only one thing left. Add some fuel (denatured alcohol; PVC is soluble in
gasoline)
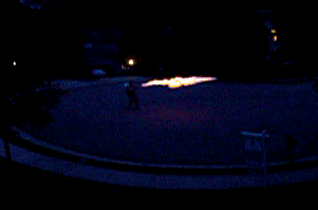
 And TURN UP THE
MOTHERFUCKING HEAT. I accidentally set my camera to long exposure, so some of
the pics look blurry. It worked out well for capturing the flames, though.
And TURN UP THE
MOTHERFUCKING HEAT. I accidentally set my camera to long exposure, so some of
the pics look blurry. It worked out well for capturing the flames, though.


 And two animations
I made from video clips:
And two animations
I made from video clips:

 Two more
animations:
Two more
animations: