GI Photo Joe
Photo Tip #4
|
You need to have image-editing software to be able to accomplish this tip. If you would like to combine your action figures with another photo that will be the background image, then follow the procedures listed below. I used Adobe Photoshop image-editing software to manipulate this image.
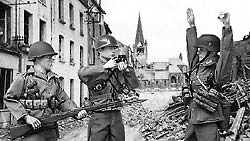
Here is the combined photograph using Adobe Photoshop software. Note that the background image has been reversed and that the Infantrymen have been removed. The remaining information pertains to the procedures I took using Adobe Photoshop software to combine the two images. Open up your action figure image file and crop down to your figures, leaving only white behind them. Use the Magic Wand tool set to a tolerance of 20 and Shift-Click all of the white areas around your action figures, making sure to get the places in-between the arms and rifle/sling. Then Select-Inverse, Select-Modify-Contract - 1pixel; this should provide you with only the action figures being selected. Now go to Image-Mode-Grayscale-O.K., then Edit-Copy; this should provide a copy of your action figures in the computers RAM. Close your action figures file. Open your background image file. Create a new layer and then Edit-Paste. Then Edit-Transform-Scale; then Shift-Drag one of the corners to the size that seems to work well with the background image. Use the Move Tool to position the figures where they look the most believable against the background image. Adjust-Levels to match the tonality of the background image. Then Filter-Sharpen-Unsharp Mask to make the figures clearer. Use the Eraser Tool to remove any pixels around the edges of the figures that are distracting. Use the Rubber Stamp Tool to fix dust spots, scratches, and to remove the neck & hand joints. Go around the outline of your action figures with the Blur Tool to smooth out the rough edges. Finally Flatten the image and Save. I know that these procedures are quick and brief but each image is unique and so you will have to experiment to achieve the desired results. Hopefully this information will open up some new ideas for photographing your action figures. |
Photo Tip #1 Tip #2 Tip#3 Home Joe's Gallery Links
Thanks
to my neighbors, Gene & Kathy Kent - for allowing me to photograph this
set-up in their backyard.
The
Ultimate Soldier, World War II action figures (U.S. 3rd Infantry & Wehrmacht)
- 21st Century Toys, Inc.
G.I. Joe action figure, helmet & cameras - Hasbro, Inc.
Joe's uniform, canteen & belt - The Ultimate Solder, World War II
accessories - 21st Century Toys, Inc.

 Select
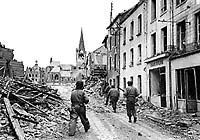
a photo that will relate to your action figures set-up as a background
image. Print out a copy of it to use for reference to study the lighting
conditions and for placement of your figures. The image on the left is the
one that I felt would work best with my set-up.
Select
a photo that will relate to your action figures set-up as a background
image. Print out a copy of it to use for reference to study the lighting
conditions and for placement of your figures. The image on the left is the
one that I felt would work best with my set-up.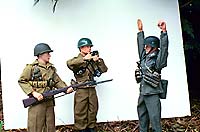 When
the weather conditions and time of day match the background image, then you can
set up your action figures. Study the angle of the sun/shadows of the
printed copy of the background image - this will help you to place your action
figures; move one around until a match is made, then place the others.
Place a white piece of mat board behind the figures as your background; this
will help you later when you need to select them out using image-editing
software.
When
the weather conditions and time of day match the background image, then you can
set up your action figures. Study the angle of the sun/shadows of the
printed copy of the background image - this will help you to place your action
figures; move one around until a match is made, then place the others.
Place a white piece of mat board behind the figures as your background; this
will help you later when you need to select them out using image-editing
software.