The Wolf's Bike Shop
With fear and trembling, we contemplate...
OK, then, let's get to it. Below are a number of pictures of the two airbox mods that I have Illustrated Manuals of; the Scooterizing (developed by Scooter, VROC #2571) and Grampsized Air Flow Control System (Grampsizing) (developed by Gramps, VROC #300) mods. It makes no difference which you choose; they both boost your performance the same.
All aftermarket airbox kits do the same thing (beside looking cool, or trick, or whatever term you prefer); change the tortuous airpath that Kawasaki installed in favor of one that can suck some air and the use of a free-flowing air filter (K&N is my personal choice). This allows the engine to breathe the way it needs to make power! Of course, with this immense amount of additional air, you have to rejet in order to rebalance the air/fuel mixture ratio to 14:1.
Most of the aftermarket kits flow around 360 cubic feet per minute (CFM) of air (some more - the Thunder Tear Drop model flows 500+ CFM - some less - the HyperCharger flows 170 CFM); so do the Scooterizing and Grampsizing mods. Without getting into advanced physics and airflow studies, let's just remember that airflow into the carb works a lot like electrical current into the starter; it will only pull what it needs. Obviously, if it needs more than the airbox system can provide, it's not going to get it, and the engine will not make the power it's capable of, no matter how spot-on the air/fuel mixture is. Over time, practical experimentation and field experience has shown that the HyperCharger does provide sufficient airflow, so what the carb needs is under the 170 CFM mark. Thus, any decision you make on what airbox mod to choose should be based completely on aesthetics; IOW, what you think looks best on your bike.
The true appeal of the Scooterizing and Grampsizing mods lies in price and pride of craftsmanship. Depending on the cost of the air filter, either mod can be done for less than $100.00 US (most of this is the air filter). Compare that to the nearly $300.00 US (or more!) you'll pay for an aftermarket airbox! And you'll still have other parts to buy (jets, crankcase vent filter, miscellaneous hardware) with the aftermarket kit; the price of Scooterizing/Grampsizing includes those items.
Neither of these mods is a "bolt-on" kit that you purchase; they are true modifications to the existing air intake system that you perform in your garage or driveway. Neither is a process for someone who still takes their bike to the dealer for an oil change, or someone whose tool collection consists of the tool kit Kawasaki provided with the bike. There is a certain amount of cutting that must be done to the backplate either to make room for the new filter or provide the opening for air, cutting to be done on the chrome cover, and the carburetor must be removed and disassembled; plus some drilling is required on the carb. However, the increase in power and performance is well worth the effort, and when it's all done, you can stand back, look at it, and say, "I did that!"
Scooterizing is popular with the "fully-open" crowd, due to its fully-open and 360ş exposed air filter. It is also the most labor-intensive of the two mods, with extensive surgery to be done to the OEM airbox backplate, and the chrome cover must be cut.
Grampsizing is popular with the "sleeper" crowd, because unless you know exactly what to look for and exactly where to look, the bike appears completely stock. But there's a surprise lurking in that engine... This is less labor-intensive, with less surgery required on the backplate, and the chrome cover remains untouched.
If you are going to go this route, you must choose one or the other. Once the surgery has been done on the backplate, there is no going back; you cannot Grampsize, then Scooterize later using the same airbox. Nor can you Scooterize, then later change over to Grampsize; not without buying another OEM airbox and starting over.
So have a look at the pics, decide which you like best, and we'll go from there!
Scooterizing

This is a "Panhead Vulcan 800 Drifter"; the owner/modifier didn't want to cut the OEM chrome cover, so he "found" an actual 8˝" cooking pan lid, removed the center knob, polished it up well, and used it instead.

This is the "standard" Scooterizing modification. Note the completely exposed air filter; this is the fully-open "look". In case you're concerned, rain will not affect this at all. The K&N air filter (and most other aftermarket free-flowing air filters) is oil-impregnated fabric; and the oil shrugs off the rain like a duck's back. I myself, and many others, have ridden through torrential rains with this modification, and the bikes never skipped a beat.
A rear top view of the finished product. Note the chrome trim the owner/modifier has added to the edges of the backplate and chrome cover.

Closeup view of a one-off customized version of the "standard" Scooterizing mod. This particular modification was done by EZ (VROC #288) on a custom 800 done for someone else. As can be seen in these two photos, after the cover was cut down, it was painted to match the bike and a (now discontinued) Fire & Steel coverplate added; again, chrome trim has been added to the backplate.

You, too, can create a unique version of this mod for your bike; the only limit is your own ingenuity.
Grampsizing

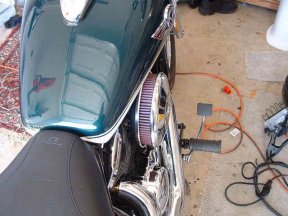
Look closely; is this 800 stock? Or is it Grampsized?

This is the only view where you can see what, if anything, is different. Note the gaping hole in the front; this is where the air enters the airbox. Make no mistake, this is a potent modification!
Either of these mods can be expected to net you a gain of 7 to 10 horsepower; with quicker and smoother throttle response. I repeat, which you choose depends entirely on your sense of aesthetics.
Grampsizing? or Scooterizing?
If you would prefer to print the above pictures out for closer study, below you will find a PDF file with larger versions. Feel free to download it (right click on the icon and "Save Target As"), print it out, and study it. In order to do so, however, you will need Adobe Reader; if you don't have that, click on the "Get Adobe Reader" banner, and you will be taken to Adobe's site.
When you've made a decision, come back here, and download the appropriate Illustrated Manual.
Please remember that this file is for your own personal use; do not distribute it to others. It is a document that is under continual revision, and dissemination of earlier versions might lead to others making mistakes due to outdated and superseded information. Not to mention that it's downright rude! If you receive a request from another rider for this file, kindly direct them to this site. Thank you.
Airbox Mod Picture file


This website is owned and maintained by Russian Wolf. All graphics, text, and documentation contained herein is © copyrighted 2012
All rights reserved

